What Makes My Edit Different?
The Book Map

What is a Book Map?
Great question! The most common definition is that a book map is a schematic overview, and I see it as a kind of outline. The purpose in creating one, whether you’re an editor or an author, is to:
Diagnose pacing issues
Find turning points
Trace cause & effect
See character arcs
Analyze structure
More!
Book maps are an incredibly effective visual aid when editing and writing because you can easily refer to certain parts of the manuscript without rereading entire chapters. You can also experiment with formatting and plot structure without worrying about lasting changes.
I create a book map with every developmental edit I do since it gives me an easy reference point and allows me to analyze the manuscript as thoroughly as possible. A book map can be as simple as an Excel spreadsheet or as complicated as a million index cards taped to your wall and connected with overlapping lines of string. It is all about your preference and the best way for you to utilize the information.
I spent many years as a writer, before I even started editing, creating book maps for my own stories simply because I’m a visual learner. However, I found the spreadsheet method a bit…limiting. It’s a great place for keeping the main outline, but I had too much information scattered between so many other platforms. Oftentimes, I would be flipping between a bunch of tabs trying to find an idea I wrote down or character information I forgot about. It broke the flow of writing and became a huge frustration. This led me to seek out a single platform that would allow me to organize all of this information in a single place. Enter: Plottr!
Plottr© was founded by Cameron Sutter, a sci-fi/fantasy author, as a program to assist writers in outlining their novels. It’s a visual aid that allows the user to organize and outline with ease whether it’s keeping track of scene locations and character names or using built-in researched plot templates. I quickly began to use Plottr as the main hub for any story I started writing. While taking Pat Dobie’s course for Developmental Editing, I had the idea to implement Plottr in my editing service. This makes my book map almost an outline within an outline, and it’s incredibly valuable to have when doing a developmental edit.
Plottr’s main ribbon is laid out as shown above with Project, Timeline, Outline, Notes, Characters, Places, and Tags.
The Project tab allows you to organize books in a series, so you can keep track of an overall timeline and all of the characters and locations across the series.
The Timeline tab is the visual representation of your story using scene cards and allows you to separate each scene in each chapter along with any other information you want to track (plot beats, character actions/location, etc.). I show an example timeline down below, and the best part is you can color code to your heart’s content!
The Outline tab takes all of the information in the Timeline and extracts it into an easy-to-read format. This is the book map outline I refer to that’s included in every developmental edit.
The Notes tab lets you keep any kind of note you need whether it’s a scene idea, random information, or a brainstorming session. They’re similar to the scene cards on the timeline that allow you to assign characters, places, and tags depending on what’s happening.
The Characters and Places tabs let you organize (you guessed it!) characters and places. You can categorize them in any way you wish and even assign a picture if you so desire. The Characters tab lets you go a bit further by having templates for character arc, description, motivations, and more. These attributes allow you to keep track of every minute detail of a character, so you’ll never need to question yourself over a background character’s eye color again.
The Tags tab is for keeping track of tags about emotions, themes, objects, red herrings, points-of-view, etc. You can assign these tags to different scenes, characters, notes, and places to have a better visual representation of how often they occur in the story.

What does a Plottr Book Map look like?
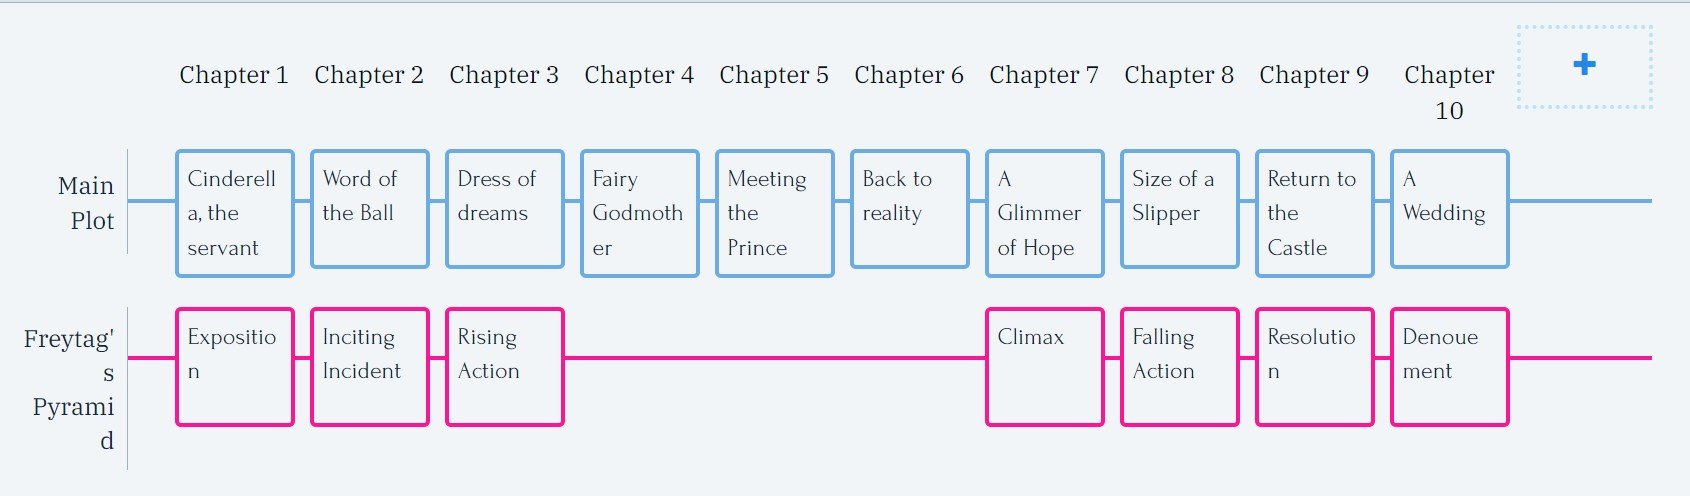
I’ve created a Cinderella-inspired book map as an example to show all of the important pieces. First is the timeline where I’ve laid out 10 chapters with one scene per chapter though you can have as many stacked scenes in a chapter as you want. The scene cards have a main label and a longer summary within that’s easier to see in the outline part below.
Along with the scene summaries, I’ve put a line for a simple plot template—Freytag’s Pyramid. This is one of the built-in templates in Plottr that come with guiding information and writing advice.
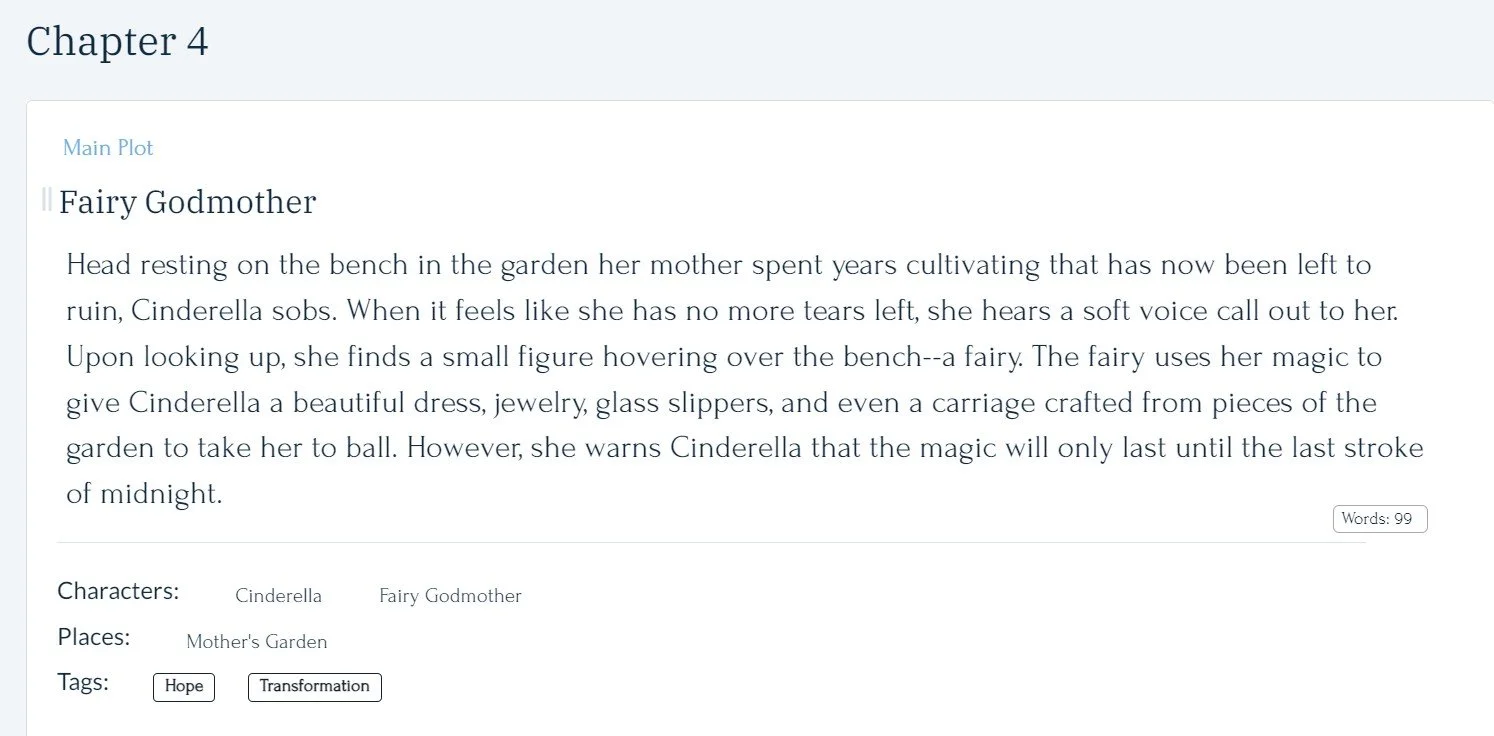
When you open up the individual scene cards, either in the timeline or outline, they look like this next picture. I always like to have a witty scene title and a pretty detailed scene summary. The purpose of the summary is to eliminate the need to go back and read the whole chapter, but you don’t want them to be superfluously long. My goal with a summary is to clearly define characterization, conflict, stakes, background, and action. I have a blog post about the best method of doing this: here.
Notice the spot at the bottom for the characters, places, and tags. This makes it easy to track who is in what scene, where the scene takes place, and any important tags that relate to the scene. Plottr also lets you filter by character, place, tag, plot, or color (if you’ve color coded certain aspects of the timeline).
Once I’ve built the book map in Plottr©, I’m able to analyze the manuscript on a closer level. That’s why I think it’s an important part of the developmental edit to include the book map outline, which contains all of the scene summaries, character and place information, tags, and plot lines exported into a Word document for easier readability. Furthermore, if you want the entire Plottr book map file to edit and build upon, it can be included in the developmental edit as an add-on.